

:: how to make maple syrup, in reverse ::
Just to keep things fun, I’m going to show you how to make maple syrup…but backwards. I’m a little tired of the Step 1, Step 2 business so we’re going to start with this:
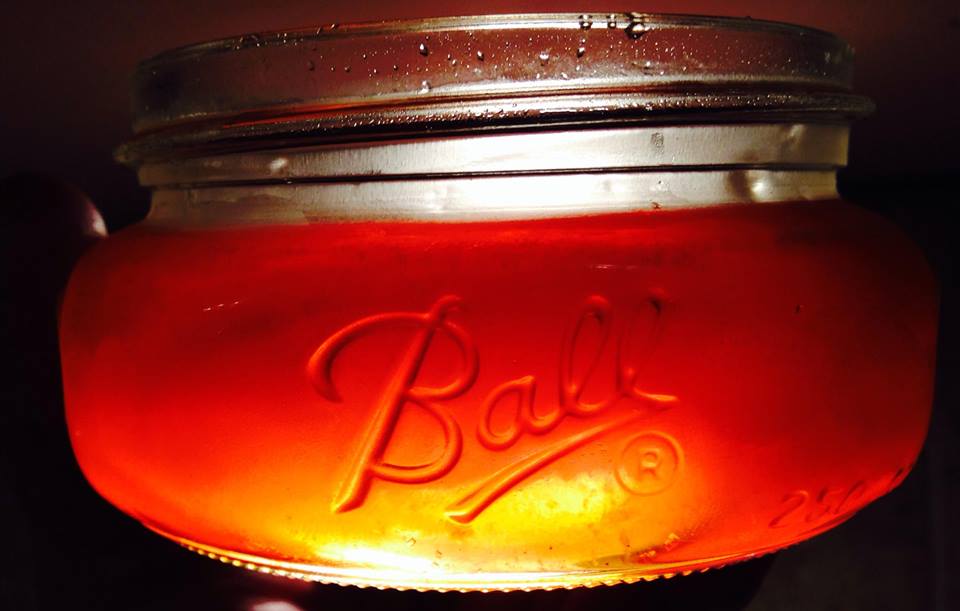
Isn’t it pretty? Beautiful, light golden, 100% pure maple syrup made in my own house. Since we’re starting at the end, let’s talk about taste. I personally think it tastes out of this world. Every time I have a spoonful I literally exclaim something like Wow! or Amazing! or OhMyGoshThisIsSoGood! I recently learned that “Yoho” is a Cree expression of awe, so I might start saying that instead. Yoho, this syrup is good! That’s me, though. We shared our syrup with a lot of people, so maybe one or two of them will chime in with their own taste opinion.

So how did we get this crop of amber goodness? Back up a step and you would have seen this:

Maple syrup has a high sugar content. But you start out with sap, and that is approximately 98% water and just 2% sugar. A major portion of the syrup making process is getting rid of all that water. To do this, you boil down the sap until the water content is where you want it. As the liquid boils, water is released in the form of steam and…well, you get it. I’m sure you understand how evaporation works. If not, please comment and I will elaborate.
You want to boil the sap until it is just right. What does that mean exactly? It depends on whom you ask. But the general consensus is that you boil until the sap reaches 220 degrees and then you IMMEDIATELY remove it from heat and bottle it. Leave it on any longer, and you will first have maple candy, then maple sugar, then a hot burnt mess that never-ever-ever comes off your pans. To this day, I have a small pot sitting by the sink that is encrusted with the charred remains of my first batch of walnut syrup gone wrong. Apparently, one nanosecond is too long to look away from a boiling pot of syrup. Don’t you find that out the hard way.
All this boiling generates huge amounts of steam, which is why most sane people do this job outdoors. As we have already established, I have my own way of doing things which means I did this steam factory business inside my house. I did attempt to start outside, but I used a camp stove which didn’t generate enough heat to bring the sap to a boil. So I moved inside and did all the boiling on my electric stove. The nice thing about working inside is that you don’t have to deal with the wind or the cold. Remember if you’re making syrup that means it’s March, and you are necessarily somewhere in the northern latitudes where “spring” looks like this:

So it’s cozier to work inside. But there are, of course, drawbacks. The steam is so prolific that it coats every window in the house with thick condensation, adding moisture to all your walls and window casings. It can cause wallpaper to peel, and leave sticky vapor trails on your walls. In the future, I plan to set up a nice syrup-boiling stove outside…something powerful and with a comfy chair installed beside it.
Going back another step, you’ll want to filter your sap at some point (some do it before boiling, some do it before bottling, and some do both) to remove all the interesting things that can end up in there. In our case we had bits of tree bark, some flies, a spider, ants, and other bits of detritus I couldn’t really identify. It’s just a byproduct of being outdoors; things are going to fall in. Into what, you ask? That takes us to our next step backward…the collection buckets.

If you don’t want to sit under a tree all day collecting sap in your cupped hands, you’ll need some kind of collection bucket. You can buy syrup buckets made just for this job or you can fashion your own. For our first season, we used gallon milk jugs. While this was an excellent way to get started at a low cost, we will not be using milk jugs again. They swing in the breeze and often get knocked out of place, allowing precious sap to drip onto the ground for hours until you notice the problem and go fix it. I would prefer to have some small buckets with lids to keep out more of the stuff that falls in.
The buckets are attached to taps called spiles. There is a certain technique to drilling the hole and getting the spile in place, which you can easily find in a book or online. For your reference, the book that got us started in maple syrup is called Backyard Sugarin’ by Rink Mann. This takes us almost back to the first step in making maple syrup: getting the sap from the tree. Sap is kind of like a tree’s blood. It’s mostly made of water, but it also contains some sugar and other nutrients which feed the tree.

The reason early spring (I’m using the term spring liberally here) is the time to harvest maple syrup is because we have freezing nights and warm-ish days. The ground freezes at night, locking the sap up in the roots of the tree. As the daytime temperature rises to the mid 40s, a vacuum effect is achieved and the sap starts flowing again. This gives opportunistic humans like us a chance to nab some of the sap as it flows past our perfectly placed tap. In general, taking some sap does not kill a mature tree. But you can certainly harm a young tree by tapping it, so you need to choose wisely which trees to tap for syrup. Think of it like donating blood: as long as you’re fairly healthy and not a small child, you can safely give blood. The same is true of trees.
Which brings us to the very first step in making maple syrup: finding a tree to tap. Although every tree has sap, not all trees will make syrup. Technically, no trees make syrup; you have to do that part yourself. (bah-dum-psss!) But what I mean is, you have to get sap from certain types of trees in order to make syrup. Maple is the obvious choice, but what kind of maple? There are many varieties of maple tree in North America but only a few of these are good for syrup. The best is Sugar Maple, but you can also use Black, Red, or Silver Maples. The sap of these trees has a high enough sugar content to yield usable syrup. Other types of trees either won’t give you enough sap to begin with, or the sap will have so little sugar that it’s not worth the effort to collect it. Keep in mind that you need somewhere around 40 gallons of sap to make 1 gallon of syrup from a Sugar Maple, and that’s the best producing variety.

We learned that it’s a good idea to map or mark your trees in the summer, when they are wearing all their leaves. That way, they are easier to identify. If you try to find sugar maples in the winter as we did, you may make some mistakes and tap trees that aren’t maples at all. We tapped a few dry trees, only to discover the following spring that these were not even remotely related to maples. It helps to be able to identify a tree from its bark as well as its leaves, but this takes practice and a good field guide.
Incidentally, there are other trees beside maples that can make syrup. Birch, walnut, and box elder all have sap that is acceptable for syrup making. On our homestead, we did two batches of walnut syrup last year. As you read earlier, the first batch met with a fiery demise. But the second batch turned out to be delicious. It was a very small batch, as the walnut tree produces just a fraction of the amount of sap you can get from a maple. But it was a worthwhile experiment, as we produced a robust little jar of sweet walnut ambrosia. After tasting some (okay, a lot) we shipped the rest to my dad. So dad, feel free to tell us all how it was. The world is listening.
A Final Note
In my spare time, I conducted an imaginary survey of 10,000 people in which I asked them how long an ideal blog post should be. My research has told me that people don’t like to read very much. So although this is supposed to be an educational post, I did leave out some important pieces of information for time reasons. If you are interested in making your own maple syrup and would like more detailed instructions, leave me a comment or check out your local library. Oh yeah, or look on that internet thing all the kids are talking about.

3 thoughts on “A Lesson in Sugarin’”